

At the end of this tutorial you should be able to:
- Load randomly initialized or pre-trained CNNs with PyTorch torchvision.models (ResNet, VGG, etc.)
- Select out only part of a pre-trained CNN, e.g. only the convolutional feature extractor
- Automatically calculate the number of parameters and memory requirements of a model with torchsummary
Predefined Convolutional Neural Network Models in PyTorch
There are many pre-defined CNN models provided in PyTorch, including:
- VGG family, named after the Visual Geometry Group at the University of Oxford. VGG models won first and second place in the localization and classification tasks, respectively, in the ImageNet ILSVRC-2014 competition. “VGG-N” has N layers. PyTorch provides VGG-11, VGG-13, VGG-16, and VGG-19, each with and without batch normalization
- ResNet family. A ResNet is composed of “residual blocks“; if some part of a neural network computes a function F() on an input x, a residual block will output F(x)+x, rather than just F(x). This connection in which we add x, the input to a block, to F(x), the output of the block, is called a “residual connection” or “skip connection” and is useful for smoothing out the loss landscape. PyTorch provides ResNet-18, ResNet-34, ResNet-50, ResNet-101, and ResNet-152.
- PyTorch also provides a whole bunch of other models: AlexNet, SqueezeNet, DenseNet, Inceptionv3, GoogLeNet, ShuffleNetv2, MobileNetv2, ResNeXt, Wide ResNet, anrd MNASNet.

Image Sources: VGG-16 model architecture (CC license), ResNet – Deep Residual Learning for Image Recognition (arXiv), GoogLeNet – Going deeper with convolutions (arXiv)
It is easy to use existing models via torchvision.models.
Loading a model with random parameters
You can construct a model with randomly-initialized parameters by calling its constructor:
 import torchvision.models as models
 resnet18 = models.resnet18()
 alexnet = models.alexnet()
 vgg16 = models.vgg16()
 squeezenet = models.squeezenet1_0()
 densenet = models.densenet161()
 inception = models.inception_v3()
 googlenet = models.googlenet()
 shufflenet = models.shufflenet_v2_x1_0()
 mobilenet = models.mobilenet_v2()
This use of the constructor produces a model that has the predefined architecture, but randomly-initialized parameters. Any model with randomly-initialized parameters will need to be trained on a particular task in order to perform well.
Loading a pre-trained model
You can also load pre-trained models. In torchvision.models, all pre-trained models are pre-trained on ImageNet, meaning that their parameters have been optimized to perform well on the ImageNet 1000-class natural image classification task.
 import torchvision.models as models
 resnet18 = models.resnet18(pretrained=True)
 alexnet = models.alexnet(pretrained=True)
 squeezenet = models.squeezenet1_0(pretrained=True)
 vgg16 = models.vgg16(pretrained=True)
 densenet = models.densenet161(pretrained=True)
 inception = models.inception_v3(pretrained=True)
 googlenet = models.googlenet(pretrained=True)
 shufflenet = models.shufflenet_v2_x1_0(pretrained=True)
 mobilenet = models.mobilenet_v2(pretrained=True)
Notice that the only difference between loading a randomly-initialized model and a pretrained model is whether you set pretrained=True or not.
Using only part of a pre-trained model
Models pre-trained on ImageNet will output predictions for the 1,000 ImageNet classes. What if you want to take advantage of pre-training, but you don’t want to make predictions on those exact ImageNet classes? In that case, you can chop off the parts of the pre-trained model that you don’t want to use, and keep only the parts you do want to use.
(Side note: pre-training on ImageNet is popular even though the exact advantages of pre-training are debated. Pre-training might not lead to better performance but it probably does accelerate convergence due to nice scaling of the pretrained parameters.)
Conceptually, CNN models often look like this:

Image by Author
It is common to chop off the final fully connected layers (yellow) and keep only the convolutional feature extractor (orange). Then, you can tack on your own fully connected layers that have the right number of outputs for whatever task you are solving.
If you already know the structure of the model, it’s literally one line of code to pick out the feature extractor:
features = nn.Sequential(*(list(resnet18.children())[0:8]))In this case, we already knew the PyTorch structure of the ResNet18 – we knew that the first 8 “children” composed the feature extractor part of the model that we wanted to keep. (That is, childen 0, 1, 2, 3, 4, 5, 6, and 7, because in Python indexing the last number you index is not included.) I say you need to know the “PyTorch structure” of the model because often, PyTorch groups together different layers into one “child” so knowing the number of layers in a model’s architecture (e.g., 18 in a ResNet-18) does not tell you the PyTorch structure that you need to know in order to select out the part of the model that you want.
Figuring out a model’s structure
Luckily, it is easy to figure out a model’s PyTorch structure if you don’t know it already. All you need to do is print out the model:
 >>> import torchvision.models as models
 >>> resnet18 = models.resnet18(pretrained=True)
 >>> resnet18
That last line says only “resnet18” (the variable name); this line will cause PyTorch to print out the definition of the ResNet18 model so you can look at it, assuming you’re working in an interactive environment.
Here’s what gets printed out, with the indexable “children” highlighted so you can see how we end up with indexing [0:8] to pick out the convolutional feature extractor of this particular model:

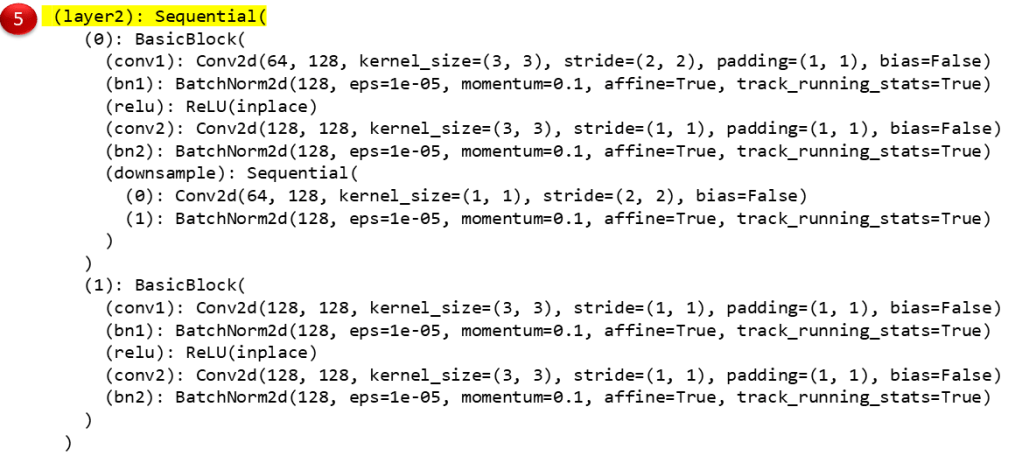


Image by Author
From looking at the image above, you can see that indexing [0:8] goes through all the convolutional layers and excludes only children 8 and 9, which are the AdaptiveAvgPool2d and Linear (i.e. classification) layers.
There are two equivalent ways to select out children 0, 1, 2, 3, 4, 5, and 7:
 >>> import torchvision.models as models
 >>> import torch.nn as nn
 >>> resnet18 = models.resnet18(pretrained=True)
 >>> features = nn.Sequential(*(list(resnet18.children())[:-2])) #first way
 >>> features = nn.Sequential(*(list(resnet18.children())[0:8])) #second way
The last two lines above, indexing [0:-2] (all but the last two children) or [0:8] (all children up to but not including child 8) are equivalent for this model.
If you want to double check that you’ve selected out the right part of the model, all you need to do is get PyTorch to print out the piece of the model you’ve selected by typing in the name of the variable in which you’ve stored that piece (again assuming you’re in an interactive environment):
 >>> features
 #lots of output
A common choice is to select out all the convolutional layers of a pretrained model, as shown in the ReNet18 example above. But you don’t have to select out all the convolutional layers if you don’t want to. You could select out only some of them:
 features = nn.Sequential(*(list(resnet.children())[0:1]))
 features = nn.Sequential(*(list(resnet.children())[0:2]))
 features = nn.Sequential(*(list(resnet.children())[0:3]))
 features = nn.Sequential(*(list(resnet.children())[0:4]))
 features = nn.Sequential(*(list(resnet.children())[0:5]))
 features = nn.Sequential(*(list(resnet.children())[0:6]))
 features = nn.Sequential(*(list(resnet.children())[0:7]))
Refining the feature extractor on your task vs. keeping the feature extractor fixed
By default, the feature extractor’s parameters will be refined on your data during training. However, you might want to keep the feature extractor’s parameters fixed – for example because you believe the performance will be approximately equivalent and you want to reduce memory usage by preventing calculation of gradients through the feature extractor.
If you want to keep the feature extractor’s parameters fixed, then you can tell PyTorch that no parts of the feature extractor need gradients, and then the feature extractor won’t be updated during training:
 resnet = models.resnet152(pretrained=True)
 self.features = nn.Sequential(*(list(resnet.children())[:-4]))
 #Fix the parameters of the feature extractor:
 for param in self.features.parameters():
     param.requires_grad = False
Where do downloaded models live?
Every time you select pretrained=True, by default PyTorch will download the parameters of a pretrained model and save those parameters locally on your machine. All of the parameters for a particular pretrained model are saved in the same file. PyTorch tells you the path to that file when it downloads the model for the first time:
 >>> import torchvision.models as models
 >>> resnet18 = models.resnet18(pretrained=True)
 Downloading: "https://download.pytorch.org/models/resnet18-5c106cde.pth" to  C:/Users/Rachel/.cache/torch/checkpoints/resnet18-5c106cde.pth
 100.0%
You can transfer this parameters file to other machines. This is useful if you are working in a restricted computing environment that prevents downloads from the Internet but allows file transfers. You can transfer the model parameters file to .cache/torch/checkpoints/ on the remote machine, and everything should work seamlessly assuming you are using the same version of PyTorch on the remote machine.
Calculating the number of parameters in a convolutional neural network manually
You may be working in a memory-limited environment, and so you may want to calculate the number of parameters in different models to figure out which one has the fewest parameters. Or, you may be trying to demonstrate that Model A is awesome because Model A gets the same performance as Model B but Model A has half as many parameters. This section describes how to calculate the number of parameters in a convolutional layer manually.
A PyTorch 2d convolutional layer is defined with the following format:
 import torch.nn as nn
 nn.Conv2d(in_channels, out_channels, kernel_size, stride)
For example, the following line of code defines a convolutional layer with 64 in-channels, 128 out-channels, a 3×3 kernel, and 3×3 stride:
nn.Conv2d(64, 128, kernel_size = (3,3), stride=(3,3)) To calculate the number of parameters in one 2D convolutional layer, use the formula:
params = in_channels x out_channels x filter_height x filter_width
For the example layer above, the calculation is:
nn.Conv2d(64, 128, kernel_size = (3,3), stride=(3,3))
params = 64 x 128 x 3 x 3 = 73728
Here’s another example:
nn.Conv2d(32, 16, kernel_size = (2,2), stride=(1,1))
params = 32 x 16 x 2 x 2 = 2048
The formula is similar for a 3D convolutional layer:
params = in_channels x out_channels x filter_height x filter_width x filter_depth
Here are a couple examples of 3D convolutional layer parameter calculations:
nn.Conv3d(64, 128, kernel_size = (3,3,3), stride=(3,3,3))
params = 64 x 128 x 3 x 3 x 3 = 221184

nn.Conv3d(32, 16, kernel_size = (2,2,2), stride=(1,1,1))
params = 32 x 16 x 2 x 2 x 2 = 4096
This can obviously get tedious if you’re trying to calculate all the parameters in a CNN with many layers. Luckily, we can calculate the number of parameters automatically using torchsummary.
Calculating the number of parameters and the memory requirements of a convolutional neural network automatically
The Python package torchsummary can automatically calculate the number of parameters as well as the memory requirements of a particular model.
Here is an example of using torchsummary:
 >>> import torchvision.models as models
 >>> from torchsummary import summary
 >>> resnet18 = models.resnet18().cuda()
 >>> summary(resnet18,(3,300,300))
The output of the call to summary() looks like this:

The (3,300,300) in the call to summary() is an example input size, and is required when using torchsummary because the size of the input data affects the memory requirements. For a ResNet18, which assumes 3-channel (RGB) input images, you can choose any input size that has 3 channels. For example, (3,251,458) would also be a valid input size.
Here are three examples of using torchsummary to calculate total parameters and memory:

Summary
PyTorch provides many CNN architectures pre-trained on ImageNet, which can be used from their pre-training initialization or from a random initialization. These models can be used in their entirety (i.e. 1000-class classification, following the ImageNet classes) or in partiality (e.g. selecting out only the convolutional feature extractor for use with a new set of fully connected layers). torchsummary enables automatic calculation of total parameters and memory requirements.
Stay tuned for future posts about building custom CNNs and custom PyTorch data sets, based on my pytorch-computer-vision repository of PyTorch code for training and evaluating custom models on custom data.
Featured Image
The featured image is a photo of Habitat 67 from Wikimedia Commons (license: CC).
Want to be the first to hear about my articles bridging healthcare, artificial intelligence, and business—and get a free list of my favorite health AI resources? Sign up here.

Comments are closed.